
Seems like a deviation from my normal travel posts. But any life endeavour is a journey, right? :D
For now, I am going to focus on the best adhesives available out there which can be used on important stuffs like wedding invitations. Why? Because you just can't use any glue that will ruin the total appearance of your invitation. And the adhesive should be strong enough to withstand time and constant handling of your guests as well. For sure, they would often pull out your invite from the envelope to admire its elegance (Ok, I can get carried away sometimes.) but I am sure you know what I am talking about. So enough yakking and let me get on with the what's hot and what's not adhesive. Brides-to-be, this post is for you!
Disclaimer: I blurred the names in respect of the couple's privacy :)
So I tested a few adhesives on some drafts to check which ones will look nice and will stick and which ones are better for other craft projects (Let's not be cruel, some glues are meant for other things :D). Here are the ones I tried for my DIY project:
 |
| 6 adhesives in total: a glue tape, a double-sided tape and 4 white glues with different applicators. |
I know white glues are all the same but they differed in applicator so I bought a lot to try them out.


My instincts were right! The sample looked nice though the bottom part looked a bit wrinkled because I squeezed the bottle a bit too tight at first. And it's cheap too, at twenty pesos per bottle, and one container went a long way!
This was the glue I used to seal the envelopes because the paper I used was thinner so I needed a good trusty glue to hold the thick invitations together!
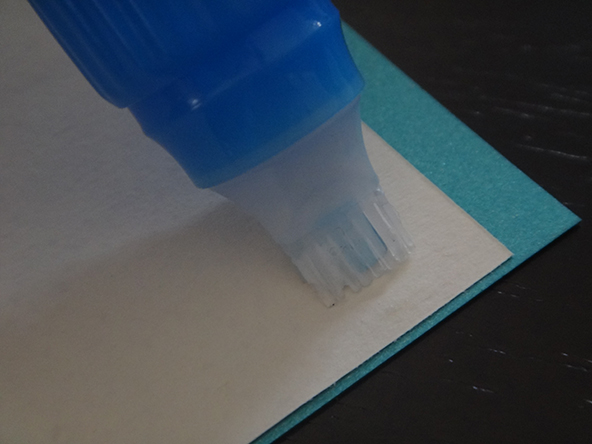
This is a white glue from "D'expertise". It was quite hard to manipulate the applicator: if I push lightly, the glue won't come out. If I push too hard, too much glue will blot the paper!

This is the finished sample. As you can see, the paper is wrinkled because I had difficulty controlling the amount of glue. Good thing this one's only P19.75, I will just save it for another project..

Hmm, I have forgotten to snap a photo of this Leeho Art and Craft Multi-Purpose White Glue. Darn.. But the end product looked nice and I especially liked that this one has two applicators: one pointed and the other flat. The pointed end is good for corners and small papers and the flat side is good for covering a lot of surfaces.
However, the lower right corner of the sample looked a bit wrinkled because I had trouble squeezing the tube at first and the glue dried a bit fast before I was able to spread it. But I intended to use this in case I ran out of the Max Bond :) At 21.75 per tube, this one's a keeper!

Elmer's Glue has always been my go-to adhesive. At P21.75 per small bottle, it's sticky and cheap. As you can see, the sample also looked nice without any wrinkles but I set this one aside because I had to spread the glue with my fingers and it was quite messy and a hassle considering I had to wipe my hands clean before I continue to paste another set again!

This is the A Plus Adhesive Roll-On Tape. It looked promising as it was easy to apply without the mess. It was difficult to find this, though, as not all book stores carry this glue tape.

I really liked the look of the finished sample. There was no mess, no excess glue sticking out of the sides and most of all, the glue was easy to roll on the paper.
However, after sometime, the rubber tip won't budge and at first, I thought it was just because of the texture of the paper. After several tries (I even turned the white knob on the right side. What is it for, anyway? There was no instructions on the packaging.), I gave up on the glue tape. Too bad, I really liked it. At 43.75 per container, it was a waste because I wasn't even able to use half of it.

The doube-sided tape. No mess, no excess glue on the sides and you know you can use all of it. It looks really neat, too! The downside? It's tiring to cut, stick and peel. O.o

In the end, I used glue sticks no matter what the other DIY-ers said on forums. Most commented that glue sticks are costly. Yes, the Scotch costs 22.00 per tube (15 grams)while the Elmer's cost 60++ each (22 grams per tube). And other comments indicated that glue sticks are messy because of the clumps.
Indeed the Scotch was too soft that it broke easily when applied, causing lumps to form on the paper. So what I did was twist the tube until only a small part of the stick is out to lessen the chances of clumping.
On the other hand, that was why Elmer's was more expensive. Not only the tube contains more, there was no lump and breakages when I used it. It was smooth to apply on paper and it stuck to the board pretty well, too. Sometimes, quality does equal higher cost.
In summary, I used the Max Bond glue on the envelopes because its small applicator is easy to use on small surfaces. It dried fast and was strong, too!
 |
| Sample envelope |
By the way, I consumed three tubes of glue stick plus two rolls of double-sided tape for 120 invites, each set containing 4.25 inserts (The .25 is the one that has the couple's monogram). Of the three glue sticks, one was Elmer's All-Purpose (22 grams), while the other one was Elmer's Extra Strength (25 grams). The last was the Scotch Permanent Glue Stick (15 grams).
For all 120 envelopes, I used the Max Bond All-In-One Glue and I doubt I even used half of it. Yey! Don't you just love it when you made the right choice and it performed way better than you expected plus it's economic?
So there, fellow DIY-ers and brides-to-be. I hope I am able to help you out even if it's just about adhesives.
Till next DIY project!
No comments:
Post a Comment