Friday, 8 April 2016

Tales From a Viajera: Of Friendship, Sandbars, and White Sand - Magalawa Island

Even this Lab knows it time to hit the beach! Photo (C) flickr.com/dieysi
The heat has become unbearable. That's it. Summer has officially begun.

Hubby and his friends planned a one-day beach getaway. Of course, they need to bring their wives/ girlfriends with them or else all hell will break loose (he-he!).

At first, five couples agreed on a date, 19th of March. It was a Saturday and surely, most have no work that day. But due to some reasons, 2 couples backed out and only six of us went on.

I helped hubby look for a destination. One of his friends posted about a beach in Zambales on Facebook a year ago and being tagged in that post, I suggested we go there instead.


And where is this place? It's in Palauig, Zambales. Yes, I am talking about the enchanting island of Magalawa.


We first took the bus bound to Iba, Zambales. We met up with another couple, Green and Herlyn, at 3.30 in the morning hoping to catch the 5 am trip. At the Victory Liner terminal in Caloocan, we learned that there was a trip as early as 4.30 am to Sta. Cruz, which was way better because from Iba, we needed to transfer to a bus to Sta. Cruz. Oh well, lesson learned: trips may change from time to time. Bus fare: 342 pesos each and travel time took about five hours.


Photo (C) flickr.com/dieysi
Magalawa Island, here we come! That's me and hubby in black; Green and wife Herlyn in, well, green :) Photo (C) flickr.com/Dieysi

At Iba, Zambales, the bus conductor informed us kindly when it was time to alight and transfer to a bus bound for Sta. Cruz. But we were bound to Pangolingan and the fare was just around 44 pesos each. The trip took about 40 minutes only.


Pangolingan, tricycle terminal.
Just inside my head: This looks like a bumpy ride.. Photo (C) flickr.com/dieysi
The sight told me it's a long ride.

At Pangolingan, we looked for a tricycle which will bring us to the Luan Port where we will take our boat ride to Magalawa Island (finally!). At 100 pesos per person, and only two passengers each, however, the tricycle ride was loooong and uncomfortable due to the rough road. 


And more rough roads O.o
Want to book a room? Contact Mang Mulo!
We decided to stay at Ruiz Resort (There are only two resorts in Magalawa and the other one is called Armada.) but we explored Armada the next day by paying 50 pesos each person.


At Luan Port. This is the jetty for boats heading to Ruiz Resort.
We waited for the boat that will take us to Ruiz Resort. Boat ride costs 100 each person (two-way).

Of the two, I liked Ruiz Resort better because it is much more cooler with all the trees scattered around the resort. Plus I like the fact that there are two sets of bathrooms there, totalling to 7 cubicles in all.


Nobody was using this table when we arrived. I thought it was a steal, until I learned why other campers stayed away from it. The tree was infested with hairy caterpillars! 
Excuse me, I feel itchy all of a sudden O.o Photo (C) flickr.com/dieysi

Even the restrooms were shaded by trees! This one is just for showering only though. 
On the other hand, Armada has a cleaner beach with less sea-grass plus a sandbar to boot. And since it's on the tip of the island, those who stay at Armada got to enjoy two sides of the beach. Wonderful, isn't it? 

However, while I was swimming along the beach in front of Armada, I got bitten by what it felt like a sea-mosquito a lot of times (huh?!), which never happened while I was snorkelling in front of Ruiz Resort. But I saw more sea stars (Yes, starfish is now officially named sea star well because, it isn't a fish in the first place.) along Armada's beach.


Ok, enough talk. Here's the beautiful island of Magalawa!

We decided to explore the island before the sun set and discovered a fishing community.
You can bring your own tent in Magalawa just like what couple Oji & Roan did! Photo (C) flickr.com/dieysi
Even the sight of hermit crabs makes me happy!
The vegetarian sea monster.
Monstrous as it looks, the greenish marina creature above only eats tiny aquatic animals, algae and waste. Called sea cucumbers, this specie is the longest one.

Well tell that to the marines! Those tentacles scared the hell out of me and I refused to swim past the taller sea grass because of them! Plus, weird as it already looks, this marine creature will spit its internal organs at a predator via its anus (WHAT?!?) to escape. Hey, I just read it here!


Another specie of sea cucumber. And some people eat them. Really?
How come there's Lionfish here? It maybe small but those spikes are full of venom!
This is the boundary between Ruiz and Armada Resort.
Hubby was excited to explore Armada's side of the island.
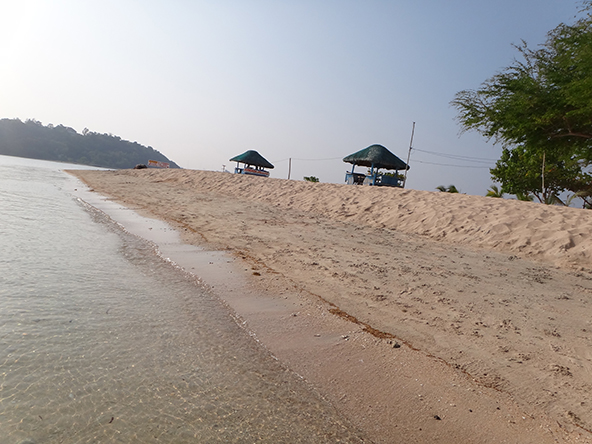
We're reaching the tip of the island and it looked like a sandbar! Photo (C) flickr.com/dieysi
The other side of Armada Resort. Double beach? I'm so jealous!
The beach on Armada's side sloped, though. Be careful when you have small kids!
It's quite enjoyable to snorkel at Magalawa. Sea Stars abound the beach :)
 Yep, marine biologists have changed their name from starfish to sea stars. They aren't even fish in the first place.

If I am not mistaken, that's a Chocolate Chip Sea Star on the upper right!

Have you seen the underside of a sea star?

Ugh, those spikes definitely look painful if you accidentally step on them. So watch out!
This one looks dead. Pretty as they look, we definitely should leave sea stars alone. Snap a picture, touch them, but never take them out of the water too long.
Pipefish! Do you see it? It's basically a straightened-up sea horse!
Can you spot the Cuttlefish?

 Alas, the time has come for us to head back to the jungle - I mean Manila. Well, till next beach adventure!
  
They said Zambales mangoes are the best! This kiosk is found along Mango Highway before San Antonio!
Photo (C) flickr.com/dieysi


 Liked what you've read? Please click follow me or join my mailing list to be informed of new posts :)


Thursday, 7 April 2016

DIY Series | Wedding Invites

I would like to share my latest adventure - DIY wedding invites! Since hubby is a great artist, he started to design great and elegant invitations and a friend referred her sister-in-law to us so we can do her wedding invitation.

Seems like a deviation from my normal travel posts. But any life endeavour is a journey, right? :D

For now, I am going to focus on the best adhesives available out there which can be used on important stuffs like wedding invitations. Why? Because you just can't use any glue that will ruin the total appearance of your invitation. And the adhesive should be strong enough to withstand time and constant handling of your guests as well. For sure, they would often pull out your invite from the envelope to admire its elegance (Ok, I can get carried away sometimes.) but I am sure you know what I am talking about. So enough yakking and let me get on with the what's hot and what's not adhesive. Brides-to-be, this post is for you!

Disclaimer: I blurred the names in respect of the couple's privacy :)

So I tested a few adhesives on some drafts to check which ones will look nice and will stick and which ones are better for other craft projects (Let's not be cruel, some glues are meant for other things :D). Here are the ones I tried for my DIY project:


6 adhesives in total: a glue tape, a double-sided tape and 4 white glues with different applicators.

I know white glues are all the same but they differed in applicator so I bought a lot to try them out.


I liked this Max Bond "All-In-One" Glue. I find the applicator easy to use and it was easy to control how much glue should come out. Only downside is, the glue easily dries around the tip so I had to remove the dried-up glue before I use it again or else the glue will clump.


My instincts were right! The sample looked nice though the bottom part looked a bit wrinkled because I squeezed the bottle a bit too tight at first. And it's cheap too, at twenty pesos per bottle, and one container went a long way!

This was the glue I used to seal the envelopes because the paper I used was thinner so I needed a good trusty glue to hold the thick invitations together!


This is a white glue from "D'expertise". It was quite hard to manipulate the applicator: if I push lightly, the glue won't come out. If I push too hard, too much glue will blot the paper!


This is the finished sample. As you can see, the paper is wrinkled because I had difficulty controlling the amount of glue. Good thing this one's only P19.75, I will just save it for another project..


Hmm, I have forgotten to snap a photo of this Leeho Art and Craft Multi-Purpose White Glue. Darn.. But the end product looked nice and I especially liked that this one has two applicators: one pointed and the other flat. The pointed end is good for corners and small papers and the flat side is good for covering a lot of surfaces. 

However, the lower right corner of the sample looked a bit wrinkled because I had trouble squeezing the tube at first and the glue dried a bit fast before I was able to spread it. But I intended to use this in case I ran out of the Max Bond :) At 21.75 per tube, this one's a keeper!


Elmer's Glue has always been my go-to adhesive. At P21.75 per small bottle, it's sticky and cheap. As you can see, the sample also looked nice without any wrinkles but I set this one aside because I had to spread the glue with my fingers and it was quite messy and a hassle considering I had to wipe my hands clean before I continue to paste another set again!


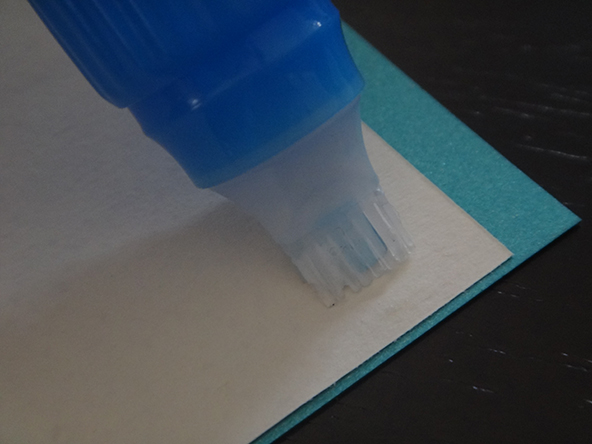
This is the A Plus Adhesive Roll-On Tape. It looked promising as it was easy to apply without the mess. It was difficult to find this, though, as not all book stores carry this glue tape.


I really liked the look of the finished sample. There was no mess, no excess glue sticking out of the sides and most of all, the glue was easy to roll on the paper. 

However, after sometime, the rubber tip won't budge and at first, I thought it was just because of the texture of the paper. After several tries (I even turned the white knob on the right side. What is it for, anyway? There was no instructions on the packaging.), I gave up on the glue tape. Too bad, I really liked it. At 43.75 per container, it was a waste because I wasn't even able to use half of it.


The doube-sided tape. No mess, no excess glue on the sides and you know you can use all of it. It looks really neat, too! The downside? It's tiring to cut, stick and peel. O.o


In the end, I used glue sticks no matter what the other DIY-ers said on forums. Most commented that glue sticks are costly. Yes, the Scotch costs 22.00 per tube (15 grams)while the Elmer's cost 60++ each (22 grams per tube). And other comments indicated that glue sticks are messy because of the clumps.

Indeed the Scotch was too soft that it broke easily when applied, causing lumps to form on the paper. So what I did was twist the tube until only a small part of the stick is out to lessen the chances of clumping.

On the other hand, that was why Elmer's was more expensive. Not only the tube contains more, there was no lump and breakages when I used it. It was smooth to apply on paper and it stuck to the board pretty well, too. Sometimes, quality does equal higher cost.

In summary, I used the Max Bond glue on the envelopes because its small applicator is easy to use on small surfaces. It dried fast and was strong, too!

Sample envelope
For the main invites, I used mostly Elmer's All-Purpose Glue Stick and consumed the Scotch Permanent Glue Stick when I ran out of Elmer's.

By the way, I consumed three tubes of glue stick plus two rolls of double-sided tape for 120 invites, each set containing 4.25 inserts (The .25 is the one that has the couple's monogram). Of the three glue sticks, one was Elmer's All-Purpose (22 grams), while the other one was Elmer's Extra Strength (25 grams). The last was the Scotch Permanent Glue Stick (15 grams).

For all 120 envelopes, I used the Max Bond All-In-One Glue and I doubt I even used half of it. Yey! Don't you just love it when you made the right choice and it performed way better than you expected plus it's economic?

So there, fellow DIY-ers and brides-to-be. I hope I am able to help you out even if it's just about adhesives. 

Till next DIY project!

Tuesday, 8 March 2016

Travels | Exploring SG on a Budget: Where to Go, Where to Eat, and Where to Shop! Part 2

Singapore's famous Roasted Chicken Rice

So the post where I wrote about the places I liked the most in Singapore was a lot longer than I expected (Well, there are certainly more which aren't included in my blog!). So I cut my post into two parts.

Where to go when you're hungry? Read on!

Get A Taste Of The Singaporean Cuisine

Why pay for expensive meals at restaurants when you can taste local food for S$2.50 or S$3.00 per meal? You can find cafeteria-like eating houses popularly known as 'hawkers' or 'coffee shops' anywhere in Singapore and they offer cheap but good food. Most are found near train stations or in the void decks of residential buildings, locally called as 'HDB'. 

Most malls have food courts such as Food Junction or Kopitiam, and they are found mostly at the top levels. They will cost a bit more because they are air-conditioned but the food almost tastes the same.

But if you want to be more adventurous, here are some famous hawker areas you can try:

1) Lau Pa Sat

Lau Pa Sat offers a wide varieties of food and a must-try is the satay, which is like kebabs. Lau Pa Sat is ideal for big groups because of the big space.

Nearest train station will be Telok Ayer along the Downtown Line.  Take Exit A and walk about 273 meters.

2) MakanSutra
The priciest option among those listed here but you pay for the view and the ambience.
Makansutra is open from 5pm until 2am every Mondays until Thursday. The place is open until 3am on Fridays and Saturdays. On Sundays, the place closes 1 hour early at 1am.

The nearest MRT station is City Hall station and take the Esplanade link-way route.

3) Newton Food Centre

I haven't been here, honestly, so I can't say much about the food. But if you are near the area, go and try!

The nearest train station to Newton Food Centre would be Newton MRT. Take Exit B and walk for about 163 meters.
         
Wherever you eat, don't forget to try the famous chicken rice (steamed or roasted chicken) or the chicken biryani, which is an Indian recipe, or the nasi lemak, which is rice cooked with coconut and served with chicken and fried anchovies.

For noodle-lovers, I recommend the Char Kway Teow, white/black carrot cake, oyster cake, seafood crispy noodles and Pontian noodles. Try the Pontian noodles with chilli but if you don't like spicy food, order it with black sauce instead.

Crispy noodles in a small wok. Yum! Served at a food center near Lavender MRT.

Roti Prata. Having evolved from an Indian dish, it is served plain, or with egg, or with onion, or with cheese.

Laksa, a spicy noodle soup which combines Chinese and Malay cuisine.

Rojak, a fruit and vegetable salad dish which originated from Indonesia.

 
TIP:
* Food in Singapore is usually served with chilli but if you don't like spicy food, INFORM the server immediately. Or, you can have the chilli separated (especially with the biryani) so you can control the spiciness.


Where To Buy The Essentials

Singapore can be a good place to shop, if you know when and where to look. Singapore is known for the IT shows (happens three times a year) where you can buy gadgets at a cheaper price, if not, with lots of freebies. There's also the 'Great Singapore Sale', which happens during the months of May until July (National Day sale).

Keeping track of warehouse sales is also a good way of purchasing items by the bulk, and I used to subscribe to promotions blogs but the items offered are off-season and sizes can be difficult to find in cases of clothes and shoes sales.

What about chocolates for pasalubongs? What about toiletries? What about other kikay stuffs that a girl needs?

Well, panic no more! I have found some shops that offer cheaper products than those found in the supermarket though you need to search for them carefully, because they are found near residential areas and not near hotels or tourist spots.

1) Valu$  

OMG as in ohmygulay! These shops are sprouting like mushrooms nowadays and they are mostly found near MRT stations, if not on the topmost floors or basements in malls. They offer cheap chocolates, biscuits and other stuffs that are pasalubong-worthy (is there such a word?) that I go crazy whenever I shop at one. The biggest branch I have seen is in Toa Payoh, found near the entrance/exit to the MRT station but there is one inside West Mall (third floor, if I remember right) at Bukit Batok, and at the basement of Causeway Point Mall in Woodlands.
Hubby's having a hard time choosing which to buy :)

If you are staying anywhere but near these places, fret not. You can search for the nearest branch near you online :)

Make sure to check the expiry date, though, because cheap price comes with a price (what?).

2)  Pink Beauty, Venus Beauty and Beauté Spring

Forgot to pack in your toothbrush or toothpaste? Your monthly visitor came in a bit early? Toiletries at supermarkets like Fairprice (locals call it NTUC) and Giant are quite expensive and you'll need that extra cash to buy souvenirs for your family, friends and co-workers. If you don't mind walking a bit, try to look around at the shops outside MRT stations for the above-mentioned shops for they sell toiletries at a cheaper price. Sometimes, they even have promos and sell hand wash for S$1.00 per refill pack (Yes, I did gave hand wash away as pasalubong before :D).

3) Daiso

What can go wrong with anything for only S$2.00? The items found at Daiso may not be made in Singapore but finding unique products like a banana-holder or an apple-slicer can be useful and exciting :)
Daiso branch at Simei mall.

Daiso also offers food and drinks and you can find them in some shopping malls like Plaza Singapura and Vivo City.


4) Uncle Shops
          I don't know why a friend call them as such because some shops are manned by an Aunty (he-he) but these are the shops found outside MRT stations or below HDBs. HDBs have vacant ground floors, called void decks, and some HDBs have converted these void decks into shops and they offer stuffs you might need for a lower price.

5) SKP

If  you ever decide you need cheap party bags to put your pasalubongs into or your stuffs won't fit in your luggage anymore and you need to secure the balikbayan box you bought with packaging tape, SKP is the place to be.

SKP offers inexpensive gift wrappers, party bags, microwavables and other plastic containers. The downside? SKP shops lurk among the establishments near the MRT stations, almost hidden but there is one at the third floor of Lucky Plaza.

6) Guardian and Watsons

These establishments are everywhere, you can easily find even with eyes closed! And the biggest plus, they put some products in promotions as cheap as S$2.00 per piece all-year round! Some chocolates and goodies are also marked-down compared to the supermarkets so just be patient in scouting for what you need.

7) Lucky Chinatown

Yes, this is a shopping haven for souvenirs- key chains, can openers, ref magnets and other what-have-yous. The bonus part? You can explore the temples in the area and the shopping complex in Chinatown is nicely lit during Chinese New Year. 
 
Lucky Chinatown is very easy to find. It's right outside the train station!


And there's my mom who got so excited with all the abubots she found.

The style of the buildings in Chinatown gives you that rustic feeling that will make you return again!

Inside the Chinese temple in Chinatown.

Chinatown at night during Chinese New Year.

These lanterns really gave me that nostalgic feeling.


TIPS:
* Wear comfortable shoes. It is easier to shop around when your feet are not hurting.

* Be careful in taking photos inside some shops.

* Don't be shy to ask for directions. Especially when it's a kabayan


There. But again, this list is not exhaustive of all choices and options. Stay tuned for more posts :D


Disclaimer: Some routes may have changed from the time I have written this. Singapore's transportation improves rapidly so better check gothere.sg to find your way in case my suggestions become inapplicable.